1300 320 392


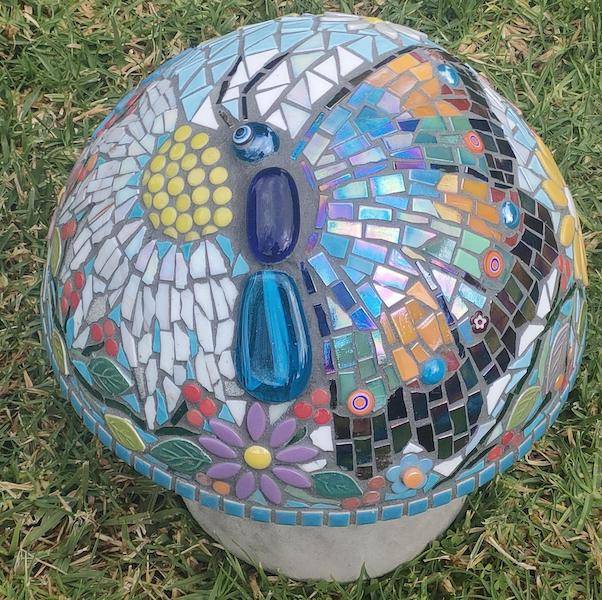
Mosaic Gazing balls are an extremely popular mosaic garden art project. In this blog, Debbi Douglas guides you through how she created this beautiful glazing ball, using a polystyrene ball as the base by rendering it before she laid her tiles.
Materials List
To Prepare The Ball:
- Polystyrene foam ball - There are different grades of polystyrene foam. Craft shops generally sell softer lower-grade polystyrene, but it is also possible to source high-density, more durable polystyrene.
- Render or waterproof cement-based adhesive. Debbi used Davco Render.
- Scissors
- Old paint brush
- Netting or mesh
- Thin wire lengths (depending upon the method you use)
- Gloves
- Apron & rags
- Towel or pot to hold the ball while being rendered
To Mosaic The Ball:
- Rendered polystyrene ball
- A selection of mosaic tiles
- Cutting tools for tiles (optional)
- EasyTile adhesive or waterproof cement-based adhesive
- Tools for applying the adhesive
- Gloves
- Grout
- Grout additive (optional)
- Grout clean-up supplies: water, containers & rages
Instructions
Preparing the polystyrene ball
- Cover the ball with netting or mesh.
Debbi cut the mesh into small pieces, held into place with small horseshoe-shaped wire bits made from a thin wire piece. The wire pieces are then pressed through the netting & into the foam ball to hold it in place.
Alternatively, you can also use self adhesive alkaline-resistant mesh tape. The tape will adhere to the polystyrene, so it is unnecessary to secure it with wire.
3. Ensure the netting or mesh overlaps and create a flat surface. Take time with this to ensure you get a smooth finish.
4. Apply the Render or cement-based adhesive to the covered ball. You can use an old paintbrush or plastic spatula to apply the coating. The coating needs to be a toothpaste-like consistency. If you get some uneven areas, you'll need to smooth them out later. Leave it for a few days to ensure it has dried completely.
To Mosaic The Ball:
- Plan your design & source the materials.
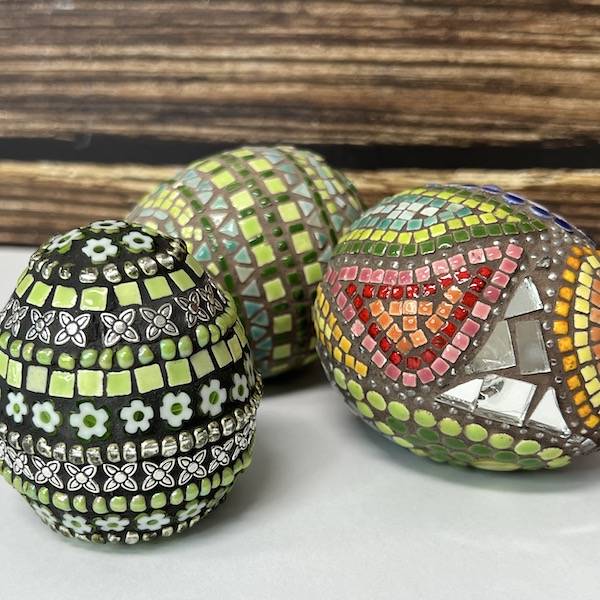
- Adhere the tiles & tesserae to the ball. Debbi started with spirals around the ball, then filled in with coloured shapes & flowers.
- Please read the manufacturer's instructions & wear the appropriate safety equipment, including gloves. Allow 24 hours for the adhesive to cure before grouting.
- Grout the mosaic. Debbi used Black grout so that the design stands out.
"I worked in small areas and smeared the grout on well before moving to the next part of the mosaic. I also did this outside with a bucket of water & a few rags. As the grout started to dry, I wet a cloth and wiped and scrubbed away the excess grout. Once I finished cleaning off the excess grout, I left it to dry overnight. The next day I scrubbed any missed spots, then cleaned again with a clean wet cloth. I followed by polishing with a clean, dry cloth."
5.Adding a grout additive will improve the grout's flexibility, which is crucial if it is in the garden and exposed to the weather. Grout additive can be purchased from a hardware store. See the manufactures instructions before use.
6. To help protect the grout further, apply a grout sealer once the grout is fully cured.
Handy tip:
"I used an old travel bean pillow for the ball to sit on while working on it, so it was stable & wouldn't roll away."