 1300 320 392


Tue, Mar 17, 2015
Transferring the Design onto your Mosaic Base
This topic looks at transferring your image (photo, cartoon, drawing) or pattern onto your base. This method is known as 'Grid Drawing' and is extremely useful and well worth mastering. If your not confident with your drawing skills or wishing to enlarge a pattern than give this method a try!
Preparation & Gridding the Design
- Choose an image or design which is large and clear, if you have a small photograph try photocopying or scanning and printing it out.
- You will have two grids, one drawn onto your image or pattern and the other drawn on your paper or base.
- Decide your grid size. Too large and you will have a lot of drawing between each square and too small the lines will be difficult to erase and it may become confusing. Don't worry about dividing your photo up in squares of exactly the same proportion, the last column and row can be smaller.
- Draw the grid lines; make sure your lines are fine, straight and clear. If you've got a photo you're not keen on marking, photocopy or scan and print the image.
- Using a sharp, medium pencil, lightly draw a grid on your paper or base. If you're using this method for the first time keep the grids the same size. You can enlarge or reduce your image by altering the size of your grid on your paper or base.
- You might want to try drawing your design onto a piece of paper before transferring the design to your base, particularly if you're trying this technique for the first time or you're enlarging the design.
|
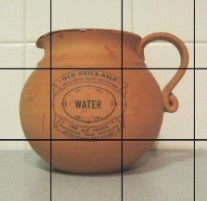
These grid lines are too far apart |
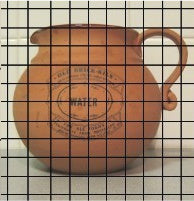
These grid line are too close together |
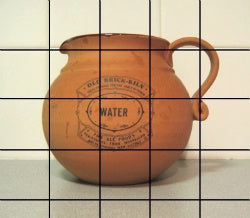
These grid lines are just right
Drawing the picture
- Where you start really depends on your own technique. You can work methodically from one side of the image or design to the other, begin with the largest features or start on the easiest section. If you're like me you'll have no set pattern!
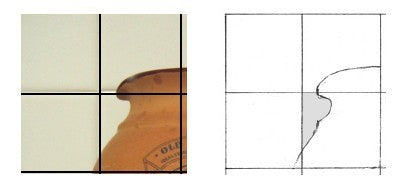
- So where do I place the lines? Use your grids to determine what section you are working in and judge the distance along the grid lines where your design intersects. It may help you to place marks on the intersecting points. Use your eye to judge where your lines should go rather than measuring them. Where an element of the design is away from a grid-line, you will need to judge the distance from the nearest grid line.
- If you're confused about which grid you should be working in, number the grids on both the image and the base. Also try covering the design and working on small sections at a time.
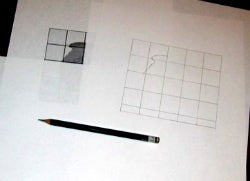
- Negative areas, i.e. voids can also be used to draw your lines (see the picture below).
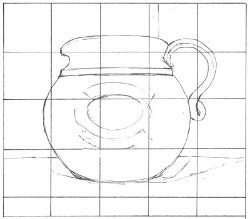
The Finished Grid Drawing
- With an eraser carefully remove the grid lines, repairing the drawing as you work.
- The finished drawing will include all major lines of the design, important detail and any shadows you'd like to include in your mosaic.
Source: Grid drawings sourced from www.about.com - Grid Drawing - Copying Pictures Using a Grid Squares by Helen South

Learn How To Make A Mosaic House Number

How To Make This Mosaic Candle Holder

Make Your Own Christmas Decorations

How To Make A Mosaic Wine Glass

LEARN HOW TO MAKE MOSAIC JEWELLERY

How To Make A Three-Dimensional Mosaic

A BEAUTIFUL GIFT IDEA USING TINY TILES

Learn How To Make This Mosaic Teapot

How To Make This Mosaic Birdbath

Personalised Handmade Mosaic Gift Ideas

Learn How To Make This Stunning Mosaic Egg

A Fantastic Beginners Mosaic Pot Project

A Simple Mosaic Project For Beginners

Three Personalised Handmade Gift Ideas

Tea Party Mosaic Tray

How To Choose Your Grout Colour

Portuguese Mosaic Birds Tray Kit

MEDITERRANEAN MOSAIC PLACEMATS

How To Colour Grout With Grout Colourant

IKAT MOSAIC COASTERS & PLACEMATS

How To Seal Mosaic Grout

What Mosaic Base Should I Use?

Personalised Father's Day Present

How To Make a Memory Board

Expressions Mosaic Stone

Help in Choosing the Correct Grout Colour

DIY Photo Frame

How To Make A 3D Flower

Talavera Mexican Tray

5 Ways To Make Flowers For Your Mosaic

Portuguese Inspired Mosaic Tray

A Simple Mosaic Table Project

How To Make a Mosaic Garden Pot

MEDITERRANEAN MOSAIC COASTERS

Ceramic Leaves Photo Frame

Ceramic Leaf Serving Tray

Make a Mosaic Stone

Mosaic Tea Lights

What Adhesive is Right for Your Mosaic Project

How To Make a Mosaic Bowl

TIPS & TECHNIQUES TO MAKE THIS MOSAIC

'Enjoy The Little Things' Chalkboard

Mandala Mosaic Pot Kit

How to Deal With Tiles of Different Thicknesses

Chinese White & Blue Mirror

Looking For a New Project?

Vintage Mosaic Serving Tray

LEARN HOW TO MAKE THIS MOSAIC CANDLE

Learn How To Make This Mosaic Flower Mirror
